This is such a cute idea. No idea where it came from but I like it...
10.22.2011
2.05.2010
Glazed Happiness (repost from The WonderCraft blog)
I'm not sure why it took me so long to fire my first batch of ceramic pieces. I've had my kiln for 2 years, fired PMC (Precious Metal Clay) in it and for my birthday last year, bought myself a block of clay. I stayed in my studio for days playing with the clay, re-familiarizing myself the texture and work time. I made some really cute stuff and rediscovered my love for basically playing in the mud.
And then all the work sat there. For almost a year.
As my dear friend, NJ would say, I had THE FEAR.
Not sure why I was afraid of running the kiln. I mean really? What was the worst that could happen? A few pieces explode? I've had that happen before, no big deal. So, I kept looking at the fragile greenware in my studio day after day. I moved them around, sanded down some edges, shuffled them from place to place when they were in the way, but never bothered to put them in the kiln. I used every excuse I could come up with... the garage was too messy so I can't get to the kiln, I should make other pieces just in case these break, I shouldn't be playing with these at all because I should focus on my resin pieces, maybe they aren't dry enough yet (because 8 months isn't enough time, LOL).
Well, 2 days ago, I got over it. I now have several bisque fired pieces with glaze drying on them, ready to be loaded back into the kiln for their final firing. Yes, I should have photos but it is the middle of the night. Give me a break. Taking almost a year to get this far has been work enough :) (UPDATE 02-04-10: added a pic at the bottom.)
Instead, here are some of my favorite ceramic inspirations. I'm looking at them with new eyes and a braver creative heart. We all get THE FEAR. Sometimes you just have to jump in and do. Stop thinking too much and do it.


Lyn Power
 Jill Taylor Clay & Magic
 Magnolia Pottery
************************************************************

Yes, not very refined pieces but apparently getting back into pottery is not like riding a bicycle. I need more practice. At least I have a good idea how the glazes react now. But I couldn't justify keeping the results to myself :) Along the top of the photo are some mini pots for my succulents, I also tried a little owl and mushroom sculptures to decorate some of my other potted plants and a few pendants. Enjoy!
Jill Taylor Clay & MagicMagnolia Pottery************************************************************

Yes, not very refined pieces but apparently getting back into pottery is not like riding a bicycle. I need more practice. At least I have a good idea how the glazes react now. But I couldn't justify keeping the results to myself :) Along the top of the photo are some mini pots for my succulents, I also tried a little owl and mushroom sculptures to decorate some of my other potted plants and a few pendants. Enjoy!
1.13.2010
Whew!
Wow, the holiday season was a busy time for all of us it seems. Running 2 crafty businesses with a full time job can takes it's toll but it was fun. I am all set to clean out my studio and get cracking on some new designs for Lucy Blue Studio.
Along with that, the girls and I have been working out the new hours for The WonderCraft's new boutique located behind the Art Pad at 4520 Burnet Rd. We debuted it in November to compliment our class and event offerings and are ready to really get it going. We are open from 12-6 on Saturday and Sunday. Of course, we also try to participate in crafty events around town so check our website to make sure we are there.

10.07.2009
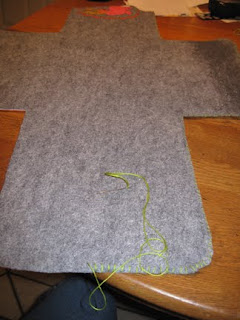
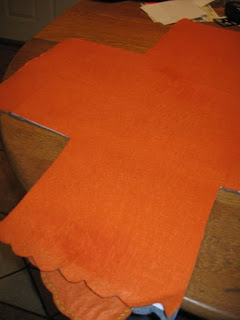
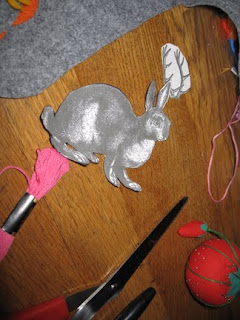
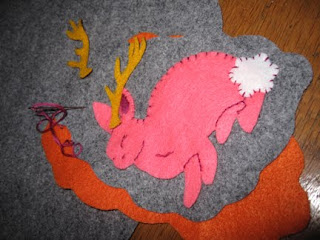
Laptop Cozy
I found this project on Design*Sponge and decided to alter it a bit to suite my taste. I loved the colors they had picked out so I stuck with that. I have no sewing skills and don't really browse around in the sewing supplies either so I had no idea what sort of fuseable interfacing to use. I picked the wrong stuff. It was too thick and when I tried to iron it the only way I could get it hot enough to stick to the felt ended up melting the felt. So, I decided to hand stitch the entire thing together then embellish it with a hand embroidered, appliqued jackalope. The melty felt parts are on the inside and I think it is still super cute. Keeps my laptop from getting too scuffed when I'm carrying it around with me and every time I look at my new laptop case I get that satisfied "I made that!" feeling. I have a whole slew of new embroidery projects I want to try. I love working with the felt because of the color and the fact that I don't have to worry about any edges unraveling.


10.04.2009
Time to get Ready for Halloween!
So, I spent the weekend working on the fun stuff for my costume. My dad gave me this great blue hat that I spruced up with some feathers and a flower. I used the same feathers and flowers to embellish one of those mini hats that seem to be so popular on Etsy these days. Now I just have to decide which one to wear. They are both really cute.
I also made some jewelry that makes it look like my head and hands were stitched on to my body. I've seen a couple of people make these and they looked easy enough. I was right. I had a set whipped up in less than an hour. Of course, when I was trying them on to fit them I think I got super glue on my neck...
So tell me what you think. Weigh in on which hat you think I should wear.
 "Stitches"
 Mini Top Hat
 Full size, vintage hat
9.09.2009
Craftiness is Genetic
When you ask crafters where they find inspiration you get the standard answers of nature, other crafters, family, etc, etc. Makes sense. We are products of our environment and what we surround ourselves with. Which is why I decided to focus on my grandmother as a source of inspiration this week. My grandmother just celebrated another birthday this past Sunday and I am continually amazed at how spry she is. Since I am trying to be a good grand-daughter, I won't mention her real age, but let's just say she was school age during the depression. I won't say which school *grin*.
 This is as messy as her work area gets.
Anyway, she is such an active person. Still heads up a local group for women trying to lose weight or keep it off (I'm convinced she joined because they get to put on little plays at the larger gatherings and she is in charge of the putting together the script and the costumes), works with the volunteer fire department and takes care of my grandfather, who is somewhere in the range of 10 years younger. Every Christmas she makes ornaments for the entire family and custom makes boxes for each of them. For holidays she has been known to make Santa or Easter Bunny place card holders for the dinner table and has sewn curtains to match the custom made sheets for the beds. Yes, she can make fitted sheets. My favorite is the ginormous Last Suppers she crochets during the winters for family member who are getting married. They are large enough to cover a good sized wall. She also keeps scissors all over the house. There is always a pair just a step away. She made holders for them all using those cheap pot holders you can get anywhere. She folded them into a cone, sewed them up and used the existing loop to hang them by.

To me, she is summed up by looking in her spice cabinet. She makes labels for all the jar lids, has them on a tiered shelf and each row is alphabetized. This is my grandmother. Organized, neat, precise and just a little spicy.

8.31.2009
Mold Making is Easy and Fun!
Mold making is fun and easy. It also helps open up new possibilities in so many crafty areas. Love your vintage button collection but don't want to use it up? Have a necklace design in mind but can't find enough beads to complete it? Love sculpting figures but can't seem to reproduce your favorite creations? Well, there are several simple mold making techniques you can try to help solve those issues.
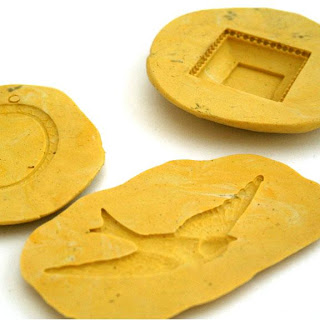
Simple one part molds can be used to capture textures or patterns with ease. Making buttons or cabochons is simple when you use a 2 part silicone mold making material. No need to worry with complex, multi-part molds and you can get to producing multiple parts in no time. This works great with clay or casting resin.
Liquid latex can be used to make slightly more sophisticated molds of 3d objects as well and objects that require the ability to capture more detail than the 2 part silicone molds can provide. This can either be brushed on or poured, depending on the product.
2 part molds can be used to make molds of more complex figures or 3 dimensional objects that may need more support than the liquid latex can provide. These can be made out of plaster or silicone rubber and are great for casting objects out of resin or for use with clay.
If you are interesting in learning any of these techniques there are several classes available! Check them out!
8.20.2009
Rubber Stamp Carving via The WonderCraft
There is still room in my class next Wednesday evening. Such a flexible skill to learn.
I made all these stamps to work on a book making project. I used black ink and stamped them on white paper. Then, after the ink was dry, the images were scanned so they could be used on my digital projects but still maintain a hand made feel.

Rubber Stamp Carving - Adults - 8/26/09
I made all these stamps to work on a book making project. I used black ink and stamped them on white paper. Then, after the ink was dry, the images were scanned so they could be used on my digital projects but still maintain a hand made feel.

Rubber Stamp Carving - Adults - 8/26/09
Carving your own unique rubber stamps allows you to add a personalized touch to your paper creations. In this class you'll design and carve 2-3 small rubber stamps and create a set of note cards with them. Once you learn the technique, you'll be able to turn any of your artwork into a rubber stamp for use on stationery, gift wrap, your own business cards and more!
Here is a picture of the one tool you'll need to buy. I know I like to see what the tools look like before I shop for them. Makes it easier to know what you need :)

7.02.2009
Geeky Inspiration
I've been getting a kick out of Neill Cameron's blog for the past few weeks. He has been doing an A-Z of Awesomeness (or going through the alphabet letter by letter and doing a really great comic-inspired illustrations). Here is a link to his explanation. My favorites so far have been the D and the J. Lately, I have been reveling in my geeky predisposition. I don't even mind that I have become a cliche. So enjoy what has been tickling my fancy lately and expect some more geeky designs to come your way!


6.18.2009
Roller Derby & Crafty Goodness
Come out and join me and 2 other talented EtsyAustin members, Kim of Devil Girl Design and Camille of Diamonds and Guns at the Roller Derby this weekend. Click the picture to go to the official website for all the pertinent information! It is guaranteed to be a good time.

See you on the track!
Subscribe to:
Posts (Atom)